
 on a Subaru SOHC EJ25")
Timing is something that freaks people out when they do it for the first time. It’s like the first time for some other things, both scary and exciting at the same time. I know I was freaked out about it when I started work on my Subaru. But I found it quite strait forward once I got into it and hope my experience can help you out. It’s an important thing to learn, as they say, timing is everything.
When I read the Haynes repair manual, it made me think that setting the timing is super complicated and that I suck and won’t be good enough to do it. Not true, I did it and my car is still running great. I know you are good enough to set the timing on your Subie too! Thus, this is a pretty detailed post as I tried not to leave anything out. So, get cozy. Also, if you have any questions or want to make a comment. Please leave one at the bottom.
For those who aren’t familiar. The job of the timing belt is to position the valves correctly in relation to the pistons for intake of fuel and exhaust. So, when a timing belt is set in the incorrect position (or wears out), valves can be smashed by the pistons and severe engine damage occurs.
With most cars, timing is set to top dead center on number 1 piston. But on a Subaru with their funny horizontal boxer engine, it is set at mid-stroke. For those not familiar, I will explain what that means later. This DIY post will explain the most minimal way to access the timing belt for doing a timing belt change. If you are already taking the engine apart for something like a head gasket job, you can ignore the first part of this post.
These are the basic tools required for this job:

1/2″ and 3/8″ ratchets, 10mm, 12mm, 14mm, 17mm and 22mm sockets, some long extensions, 14mm wrench, possibly some other wrenches, a whole socket and wrench set would be ideal. Just make sure you have a 22mm socket (my set doesn’t have one). You’ll also need a little pin (as pictured) or a small drill bit to hold the tensioner compressed, a breaker bar (possibly with an extending pipe for extra leverage, a strap wrench (or chain wrench would be better), a large phillips screw driver, flat head screw driver and some long bent needle nose come in pretty handy too.
You will also probably want some power tools. The harmonic balancer is torqued to 130 ft.lb. and breaking that bolt loose is the biggest pain in the ass of this job.

A cordless impact wrench like the one in the middle is a very useful tool I would highly recommend for anyone doing much work on cars. I just got that wrench and wish I got it sooner. It won’t, however, bust off the harmonic balancer. That big bad Chicago Pneumatics air wrench will, but won’t fit in the space available in the engine bay. A butterfly wrench will, if you have one. An air ratchet is handy for taking off the tensioner for the a/c belt if you don’t have cordless impact wrench.
There are a few other tools that you might want to have, we’ll cover that when we get there.
This blog is based on my experience working on an 2004 Legacy Outback, I know this procedure would be exactly the same for many other years of Legacys, and probably the same or very similar for many years of Foresters and Imprezas with a EJ25 SOHC.
Let’s start taking your car apart!
I would recommend jacking up the front of the car and supporting it on jack stands.
Disconnect the negative terminal from the battery.
Remove the plastic splash shield underneath, 5 x 12mm bolts underneath and 2 x 10mm screws in the wheel wells.
For consistencies sake, I will refer to the left and right side of the car as if you were in the car, like most mechanics do, though I’m not a mechanic.
Get a bucket or drain pan under the cock at the bottom right of the radiator. Get your big phillips screw driver out and loosen that cock up (things are starting to get exciting already). Careful not to strip it, it is only plastic. Pull the cock out and drain your coolant.
While the coolant is draining, remove the ram air intake. A couple of 10mm bolts in the radiator support bar. I have a video on my Youtube channel which shows this in detail.
https://www.youtube.com/watch?v=zwy0SlmHTzg
Loosen the hose clamps on the radiator hoses and remove those too. You may have to wiggle and pry them a bit to get them loose.
Get under the car and unplug the two hose fans, push the tab up in the clips with a flat head screwdriver to loosen them.
If you have an automatic transmission, there is probably a transmission cooler down there too, that will need to have the hoses disconnected. My car’s a manual, so, not totally sure.
Double check that there isn’t anything connected to the radiator, then remove the two 12mm bolts holding the radiator to the support bracket. You can then lift the whole radiator out with the fans and bottle still attached. The bottom of the radiator is in a couple of rubber seats and might take a bit of pursuation to free from the car.
With that out of the way, you will have a lot more room to work.
Remove the drive belt covers. You remove a 10mm nut and bolt, then just loosen the bolt holding the alternator onto the a/c compressor. Leave it loose so the alternator can ‘hang loose dude’.

Your engine will look something like this now. Except your power steering lines should still be attached. Label your drive belts with a paint marker, as illustrated, if you plan to reuse them.
Note: you can click on any of the pictures for a larger view.
Crank the tensioner bolt (14mm) beside the alternator so that the alternator drops down enough to remove the front drive belt.
Then loosen the locknut under the tensioner bolt for the a/c belt, loosen the bolt on the pulley, so it can slide. Then put a 14mm wrench on the bolt at the bottom of tensioner bolt and crank the bolt clockwise to loosen (it is reverse threaded).
Remove the belt once it is loose, then remove the two 14mm bolts from the block and the bracket itself.
Now you have easy access to the timing belt cover, hurray!
Except you still need to remove the harmonic balancer, that big effin pulley in the middle, boo!
Put your chain wrench with an old piece of belt to protect the pulley (or strap wrench) around the harmonic balancer.
Assuming you don’t have an impact wrench that will fit in there. Get your breaker bar out with the 22mm socket on it and start heaving. A ratchet with a hammer can work too. Either way, it is going to be a lot of work and you will be ready to give up at one point. But hang in there, it will eventually come loose.
Just be careful not to go too far over and break off the end of your coolant supply line. Because then you will curse and swear and have to weld it back on or replace the line.
After you get the harmonic balancer off and take a little break. Remove all of the hundred little 10mm bolts holding the timing belt cover off.
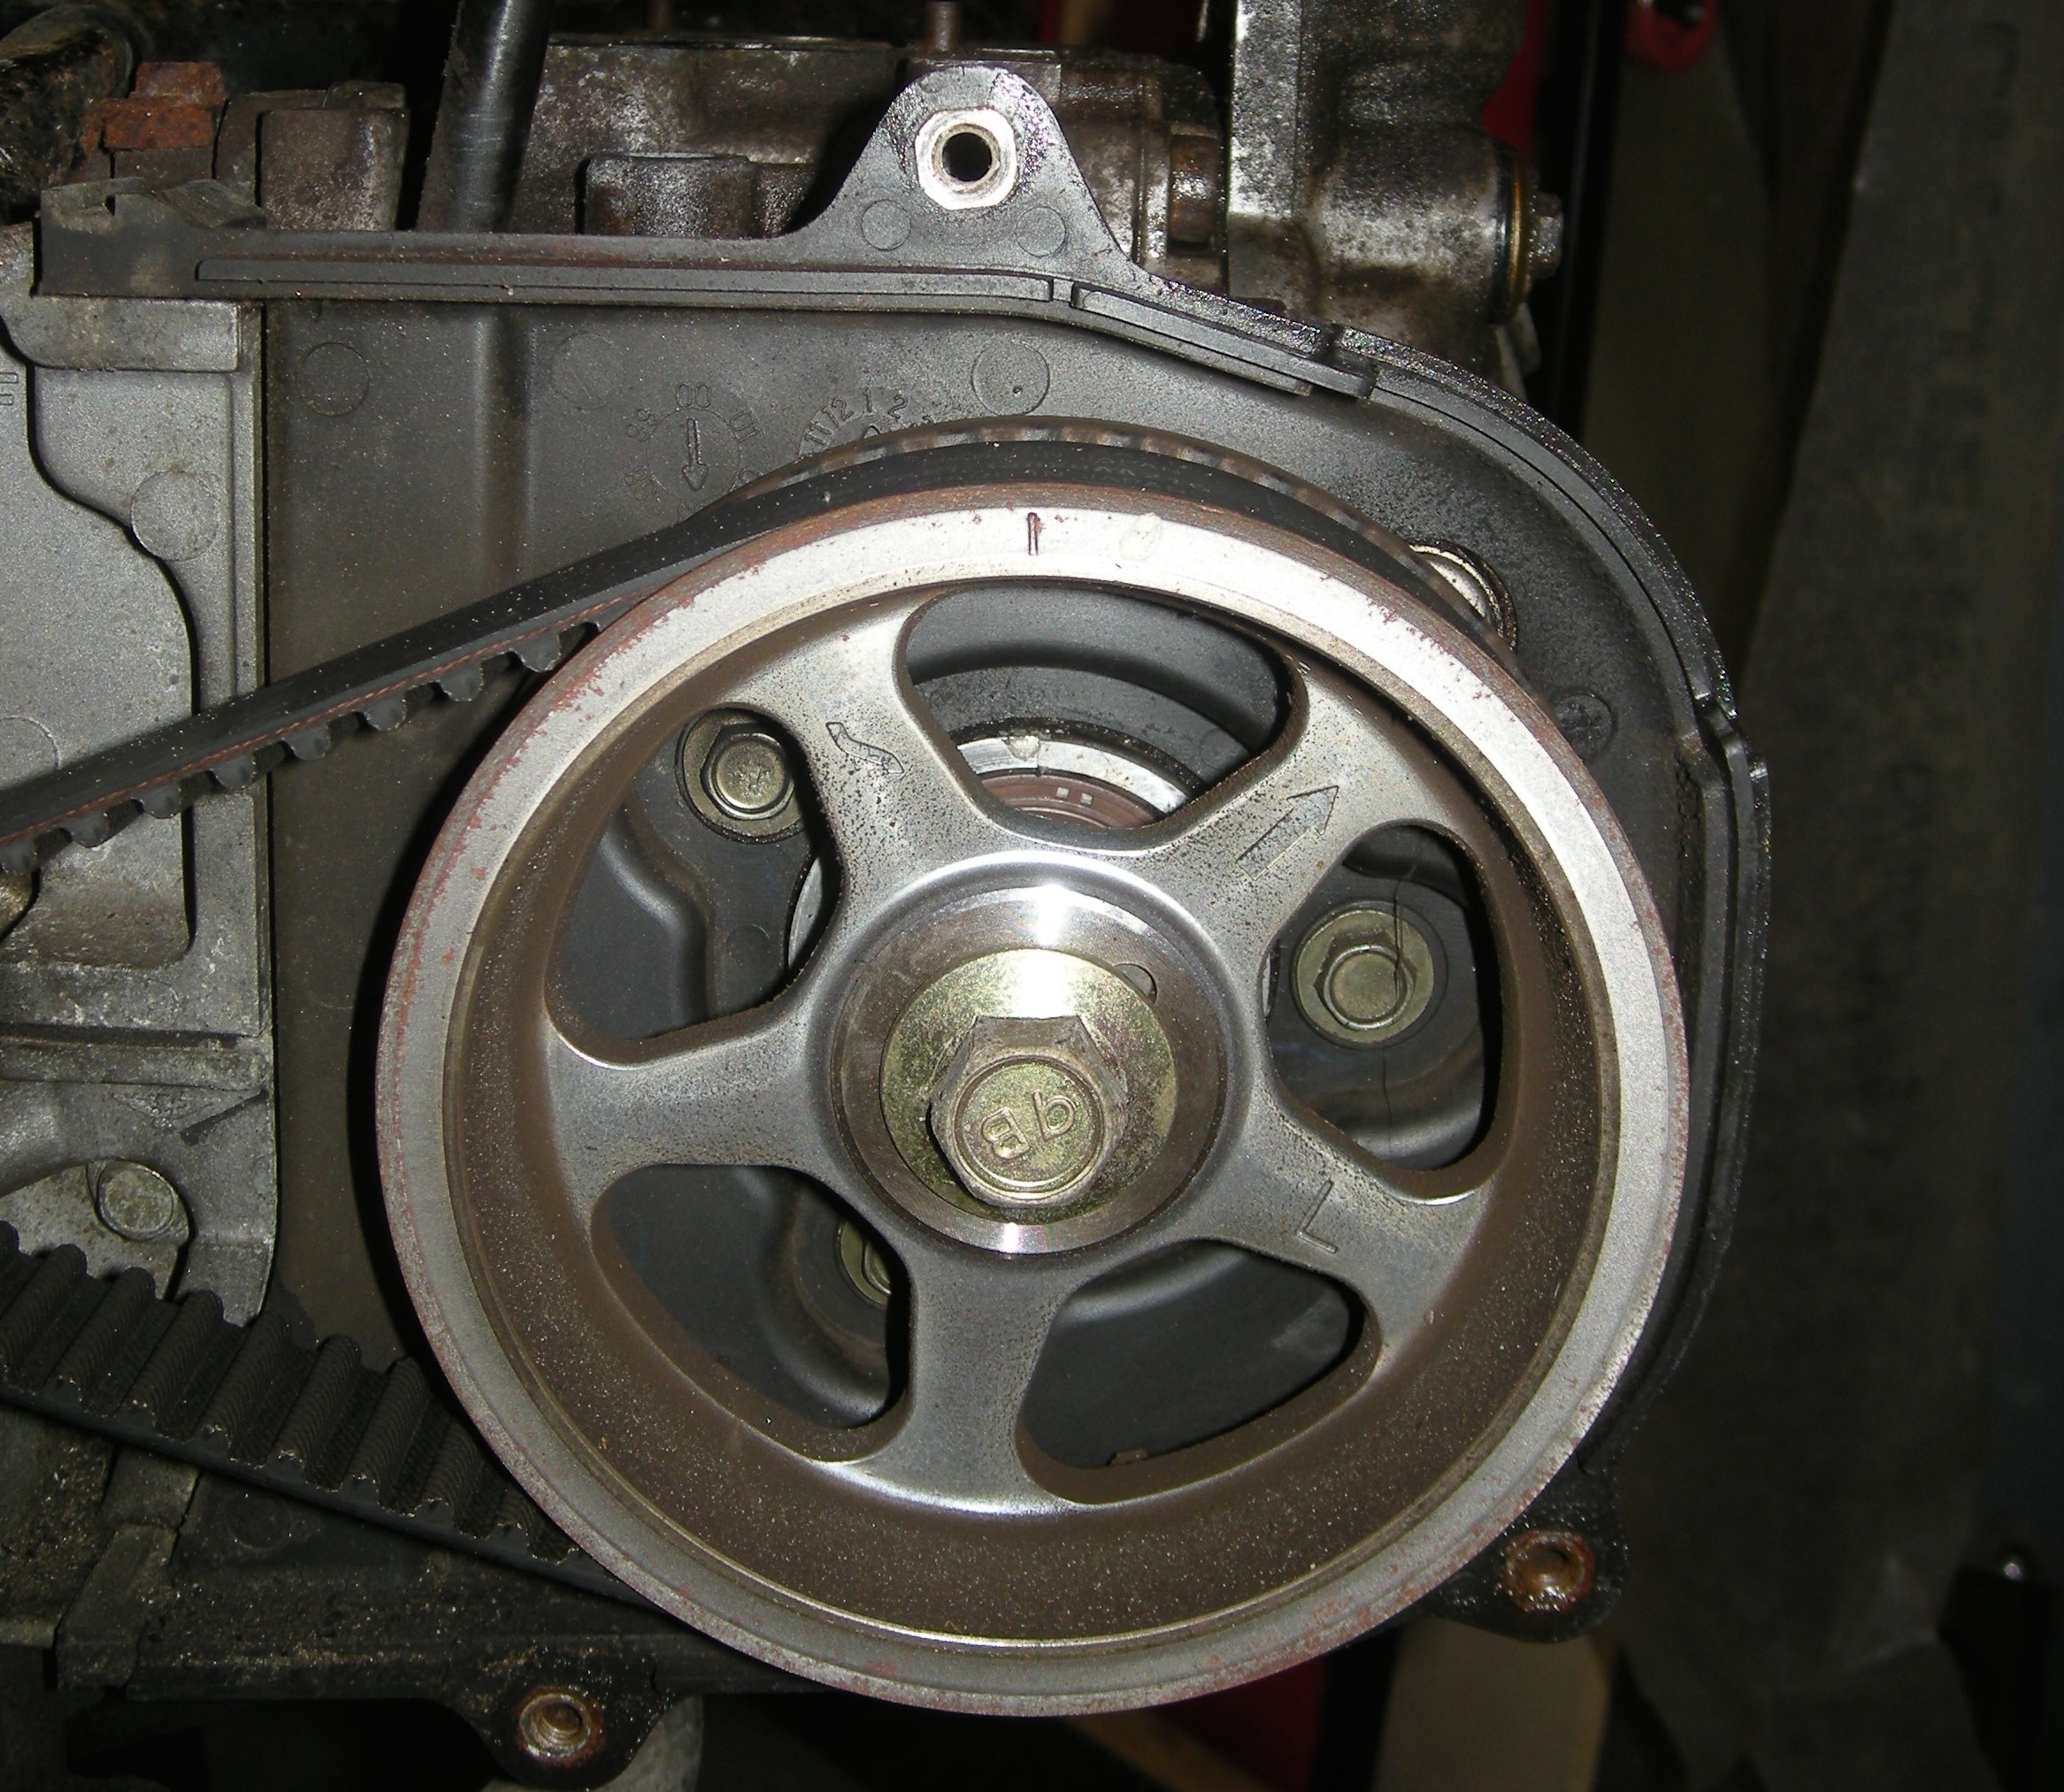
Then you will have a view something like this:

Yes, success!
Now, here is the fun part. You need to set your timing! Basically, put your car in neutral (if it isn’t already) and get these two index marks to line up like this:

If you car is like mine, there might be some dirt on the upper mark. Clean it off to locate it correctly. It isn’t quite strait up.
There are a couple of ways you can do this:
Put the harmonic balancer back on the crank sprocket with the 22mm bolt and crank the engine over (make sure it’s in neutral) with a ratchet.
Or, use two 17mm wrenches and crank over the two cam shaft sprockets simultaneously. A lot of mechanics wouldn’t recommend this. But it will work fine if you are careful and some people find it easier.
The camshaft sprockets should be inline with the index marks on the camshaft cover and marked on the block.
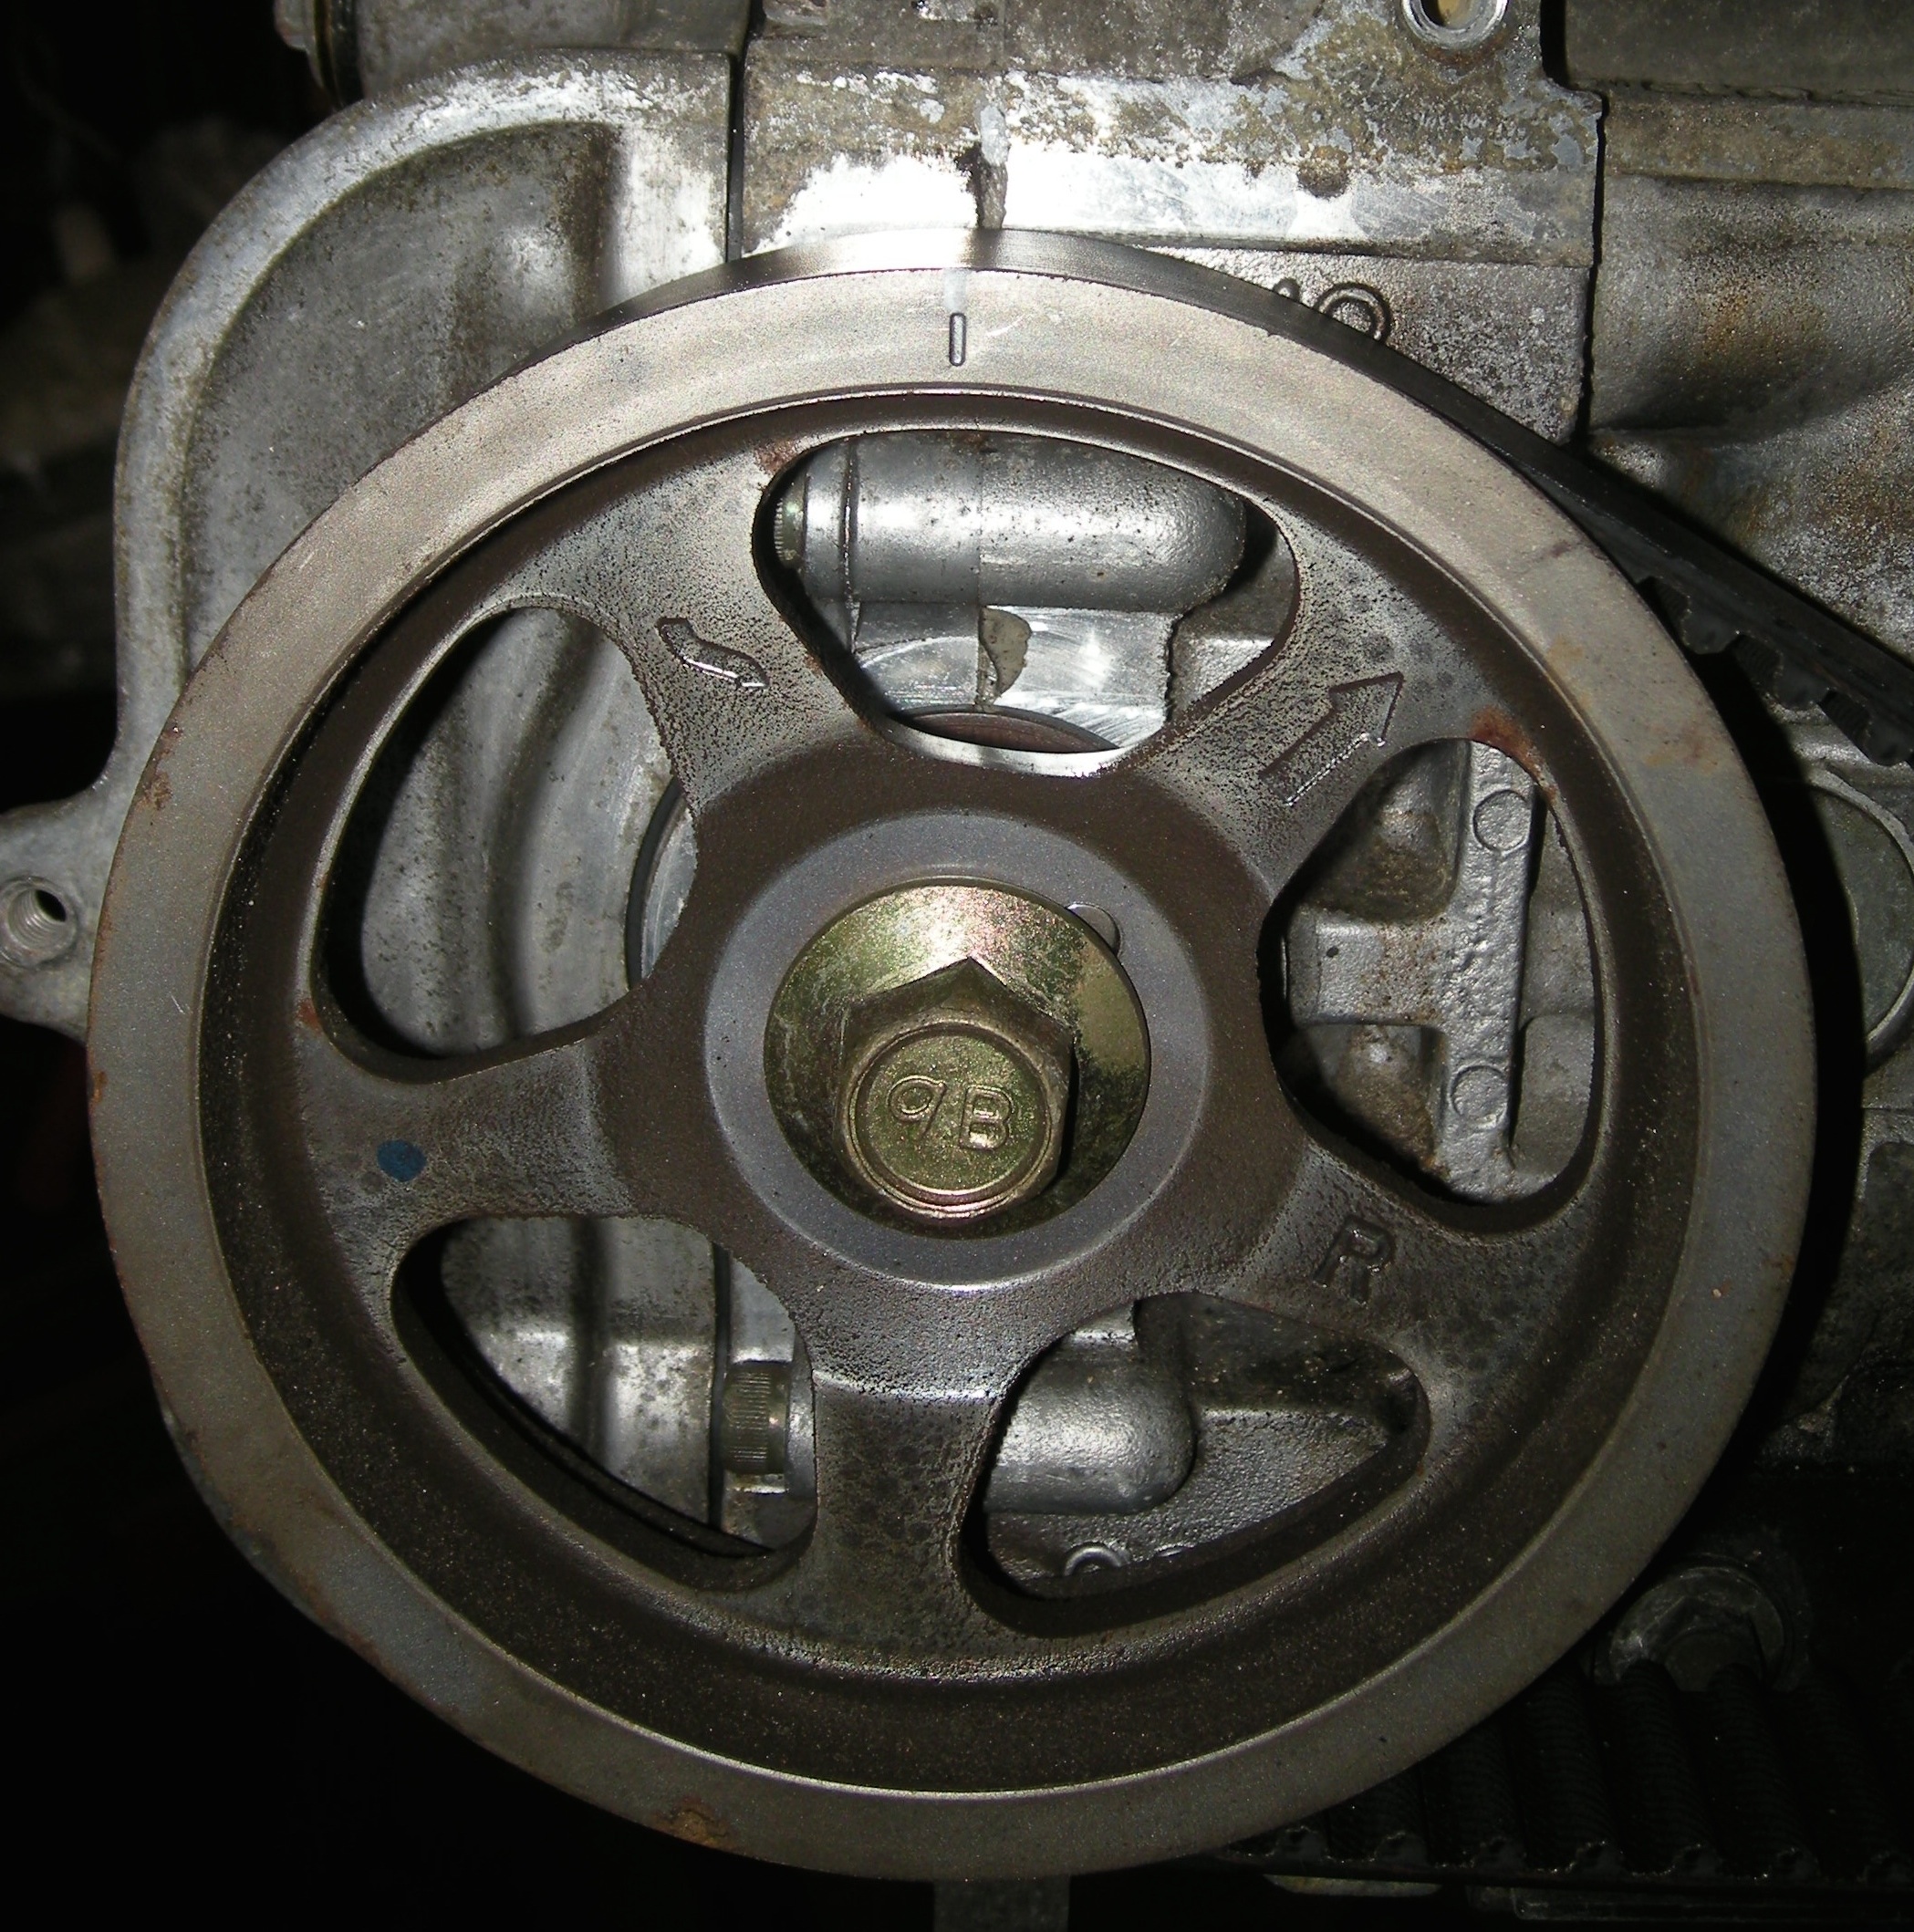
These two should actually be over to the right a little bit. The first photo of the whole engine has them in the right spot. But don’t worry too much about having these perfect. Just make sure the crank shaft sprocket is in the exact right spot.

It is a good idea to mark the relationship between the index marks with your belt (cam sprockets too) and the direction of the belt. Even if you don’t plan to reuse your old belt. Because you can use it as a reference to make sure that everything is lined up correctly before putting the new belt on.
Also, this crank sprocket isn’t lined up correctly. Again why you need to clean that dirt off of the index mark above.
To remove the timing belt:

First remove the little metal cover over the crankshaft sprocket (if applicable).
Then, one might think to first take the tensioner (blue pulley) off first. But DON’T DO THAT! That would throw too much tension out of the belt at once and throw off your timing, you so carefully set.
Instead, first remove the orange pulley (bottom left of photo), then the cogged pulley (or sprocket) beside the water pump, they are often coloured green, then remove the tensioner and the belt. You can leave the black pulley on unless you are replacing it.
Replacing the Timing Belt
In case you did pull the tensioner pulley off first and threw your timing off during removal. Or if you had the engine apart for another repair and need to move the crank over or valves, here are a few things to note so you don’t accidentally smash any valves.
If your crankshaft is at the index mark (or close to), you can freely move the cams around without coming anywhere near the pistons.
Or if you need to move the crank around and you think that some of the valves might be out, just turn the camshafts around until they feel loose, that means the valves are closed. But only do this if the crank is close to the index mark.
This will hopefully make sense when you are doing it. Put any questions in the comments below and I will try to answer them.
If you are reusing your tensioner, you will need to compress the piston in it with a vice or ‘c’ clamp, the place a pin or small drill bit in the hole to hold the piston down.
Once you have your crankshaft sprocket exactly at the index marks, replace the black pulley and tensioner bolt, torqued to 29 ft.lb. Leave the tensioner pin in place until the very last thing.
Line up the cam sprockets with the index marks above.
Wrap your old belt around to double check your marks line up.
If you didn’t do that step, wrap your new belt around the crankshaft sprocket under the tensioner and black pulley and over the camshafts. Careful not to move the crankshaft sprocket.
Working on one side at a time, create some tension on the belt, hold the belt in place on the crank sprocket with one hand, and wrap it over the cam sprocket getting the correct teeth in place so the index marks stay lined up. The teeth are pretty big, so, it will be pretty obvious when it is in the right spot.
Put a large black paper clip, spring clamp, or some clothes pins (whatever you have) around that belt on the sprocket to keep it in place.
Repeat the two previous steps on the other side.
Run the belt back over the water pump pulley and replace the green cogged sprocket beside it. Then the orange pulley last. Both torqued to 29 ft.lb.

If you removed this little black plastic bit of the timing belt cover, make sure that you replace it before replacing the orange pulley.
When you have everything replaced and feel confident that it all lines up well. Pull the pin out of the tensioner and remove the clips holding the belt on the camshaft sprockets.
Before you get all excited and start putting the cover back on, bolt the harmonic balancer back on and crank the engine over a few times slowly to make sure everything is set properly. If you feel anything touching, STOP! That means something is out and you will need to correct it.
But if everything feels good and all the index marks keep lining up as they should. You did a good job. Now before you celebrate with a beer, you might want to finish the job and start the car up first.
The rest of the installation is basically the reverse of the removal. Don’t forget the little metal cover over the crankshaft sprocket.
If you haven’t done drive belts before. The general rule of thumb is to tighten them down until you have only 1/4″ (6.5mm) deflection.
That’s it. I hope that this helps out. For liabilities sake, I should say that I am not a professional mechanic and take no responsibility if you don’t set your timing correctly and wreck your engine. Which I am sure you won’t.
Good luck. -Scott
